
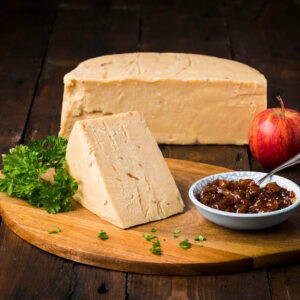
Halloumi Cheese Recipe
Here is a cheese that is very difficult to find in SE Asia and Thailand. Halloumi cheese is a very nice finger food and can be eaten in several ways. Such as a delicious cheese to put on burgers. If you don’t like mint, you can rub with most anything else. Our personal favorite is a garlic and pepper flake rub.
A couple of other differences is that in the video, it states that you wait 45 minutes for the curds to float in the poaching process. We experience to happen in a few minutes instead. We also never fold the cheese. Still not sure what the purpose of that is.
This cheese has been successfully made with store milk here in Thailand. Our favorite is Makro Aro brand.
All the ingredients are available here.
[embedyt] http://www.youtube.com/watch?v=PPNQmV7roos[/embedyt]
Halloumi Cheese

Delicious cheese that you actually fry!
- 5 Liters Whole Milk
- 2 ml Rennet (or 1/4 tab)
- 2 ml Calcium Chloride (diluted in 60ml of non-chlorinated water)
- Cheese Salt
- Dried Mint leaves
- Sanitise all equipment.
- Heat milk to 32C (90F) and then add the rennet solution. Turn off heat.
- Stir well, cover, and allow the milk to set for 40 minutes. Upon a clean break, cut the curd into 12 mm (half inch) cubes and let rest for 5 minutes.
- Stir gently and slowly heat milk to 40C (104F) over the period of 20 minutes.
- Allow curds to rest for 10 minutes to form a solid mass. Place a second stockpot under your cheesecloth lined colander and drain the whey and strain the curds for three minutes.
- Removed the curds in the cheesecloth and place on a large wooden (or food safe plastic) board, and fold the cheesecloth so that the curd is square-shaped and the curd will not escape when pressed. Place a second board on top and then add 4 kg of weight to press. I used two 2 litre milk cartons filled with water as the weight.
- Press for 10 minutes, then remove weight and top board and flip over curd mass. Re-press for 20 minutes.
- Whilst waiting for the second pressing, return the whey back to the stove and heat to 90C. You will notice that excess curd will float to the top, so scoop off most of this froth to clear the whey. Continue to heat the whey to 97C. Don’t let the whey boil.
- Remove the weights and top board from the curds, then remove the cheesecloth carefully. Place the pancake like curd onto the bottom board and cut into 100 x 150 mm rectangles, and then place into the hot whey.
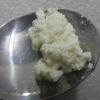
- They will sink to the bottom. Sooner or later, the cheese will float to the top. Allow the pieces to remain in the whey for another 15 minutes after floating.
- Remove cheese pieces from the whey one at a time (you may want to wear rubber gloves as the cheese may scald your hands), and coat in a cheese salt/mint leaf just like you would if you were crumbing or battering a piece of fish fillet. Whilst the cheese is still hot, fold the piece in half to increase its height.
- Allow cheese to drain for an hour, then either place in airtight container into the fridge and consume within a week. Allow 24 hours before using so that the salt permeates through cheese. Another method of storage is to vacuum pack for up to six months in the fridge (not that it will last that long, it is too yummy).


Add comment
You must be logged in to post a comment.